Setup Foreman smartproxy
![]()
![]()
Goal - A smartproxy in another subnet for an existing foremand setup
There was a foreman server running in my internal server network so far. Within the SRV Zone, puppet and foreman work like a charm. My next task was, to bring them to boot from tftp and get the answer file to automatically setup a host in the dmz. To make this easy and possible, I have to setup a smartproxy that provides tftp and a puppet server. The following steps show what I had to set up to make this work.
So lets look at the network setup below to get a better idea of the network setup.
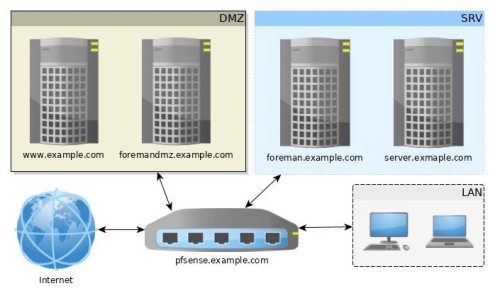
Yes, this is a single homed firewall scenario. Just because it is my home network and I do not want to fight with multiple firewalls.
If you have some hints for me or questions, please just contact me. I am always interested in learning and improving.
Preparations
Machine requirements
To successfully setup the system, you need to fulfill the following preconditions:
- Have root / management access to setup firewall rules
- Have ssh access and sudo rights to a installed ubuntu 16.04 system that stands in the DMZ zone
- Have ssh access and sudo rights to the forman main host
- The hosts are fully configured and can resolve each others host names
- make sure both hosts have the correct type and sync it over ntp
Firewall
On the firewall we need a rule that does the following:
- Allow Ports 8443 and 8140 from the foremandmz to the foreman master host (DMZ -> SRV)
- Allow Ports 8443 and 8140 from the foreman master to the foremandmz host (SRV -> DMZ)
- Allow Ports 22 (ssh) from foreman master to foremanddmz (SRV -> DMZ)
Configuration
foreman master host
generate smart proxy certificate
The new smartproxy needs a generated certificate. This can be generated on the foreman master host.
puppet cert generate foremandmz.example.comYou may validate the certificates by running the following command.
ls -la /etc/puppetlabs/puppet/ssl/*/foremandmz.example.com.pemThis should generate something like this
-rw-r--r-- 1 puppet puppet 1984 Dec 30 23:09 /etc/puppetlabs/puppet/ssl/certs/foremandmz.example.com.pem
-rw-r----- 1 puppet puppet 3247 Dec 30 23:09 /etc/puppetlabs/puppet/ssl/private_keys/foremandmz.example.com.pem
-rw-r--r-- 1 puppet puppet  800 Dec 30 23:09 /etc/puppetlabs/puppet/ssl/public_keys/foremandmz.example.com.pem
Copy these certificates to the targethost. I just made a tar of my ssl folder and moved this over to the machine in the dmz. Yes, on production I would move the certs explicitly.
In addition to the host certs, you need to copy the public keys of the ca folder “/etc/puppetlabs/puppet/ssl/ca” as well. This is required that during setup of the smartproxy, the installer validates the host certificate. I had problems setting the proxy up without the ca certificates. Looks like it is caused by the self signed certificates I use for my setup.
I used scp to copy the file over to the new smart proxy host.
scp ./ssl.tar.gz user@foremandmz.example.com:~/ssl.tar.gzNow the foreman master host is ready to work with the new smart proxy.
configure puppet entvironment plugin sync
The plugins installed on the puppet master host, have to be available on the smartproxy as well or the puppet execution will fail. I am sure there are other solutions, but for me this works and is ok.
This may be implemented on many different ways like scp, git repositories, download from a special web host or any idea you may have. I solve this by using rsync over an ssh connection and PKI authentication. How to setup such an ssh configuration should be available in world wide web ;-)
Here is the command I use to sync the files:
rsync -avc --delete -e ssh /etc/puppetlabs/code/ root@foremandmz.example.com:/etc/puppetlabs/code/For me a cronjob works without problems. I sync the folders every 15 minutes. So just “crontab -e” as root and add the following line:
*/15 * * * * rsync -avc --delete -e ssh /etc/puppetlabs/code/ root@foremandmz.example.com:/etc/puppetlabs/code/ > /dev/nullforeman smartproxy host
Add the puppet repository to apt sources
First we ensure that the required package ca-certificates is installed. Most of the time this is the case.
apt-get -y install ca-certificatesAs next step, we get the puppet5 configuration package from the puppetlabs webpage and install it. This enables the puppet repository so that the newest puppet version can be used.
wget https://apt.puppetlabs.com/puppet5-release-xenial.deb
dpkg -i puppet5-release-xenial.deb
Add foreman repositories
Together with puppet, we need the foreman repository as well to setup the smartproxy.
echo "deb http://deb.theforeman.org/ xenial 1.16" > /etc/apt/sources.list.d/foreman.list
echo "deb http://deb.theforeman.org/ plugins 1.16" >> /etc/apt/sources.list.d/foreman.list
wget -q https://deb.theforeman.org/pubkey.gpg -O- | apt-key add -

apt update
Install foreman smartproxy
I use the “foreman-installer” package to configure my smartproxy installation. The installer can be installed using the following commands:
apt install foreman-installerAfter the installer is ready, the smartproxy can be installed with the following command. The command configures the following points:
- puppet agent to manage the host
- tftp server
- puppet server proxy
- ca proxy for central host registration
foreman-installer \
  --no-enable-foreman \
  --no-enable-foreman-cli \
  --no-enable-foreman-plugin-bootdisk \
  --no-enable-foreman-plugin-setup \
  --enable-puppet \
  --puppet-server=true \
  --puppet-server-foreman-url=https://foreman.example.com \
  --puppet-server-ca-proxy=https://foreman.example.com \
  --puppet-ca-server=foreman.example.com \
  --puppet-puppetmaster=foreman.example.com \
  --enable-foreman-proxy \
  --foreman-proxy-tftp=true \
  --foreman-proxy-tftp-servername=192.168.0.2 \
  --foreman-proxy-puppet=true \
  --foreman-proxy-puppet-url=https://foreman.example.com:8140 \
  --foreman-proxy-puppetca=false \
  --foreman-proxy-dns=false \
  --foreman-proxy-foreman-base-url=https://foreman.example.com \
  --foreman-proxy-trusted-hosts=foreman.example.com \
  --foreman-proxy-oauth-consumer-key=ab3dkj.... \
  --foreman-proxy-oauth-consumer-secret=ab3dkj.... \
  -v
Finally we create a symbolic link to the puppet binary. This way, we do not have to use the fullpath all the time.
ln -s /opt/puppetlabs/bin/puppet /usr/bin/puppetInstallation complete
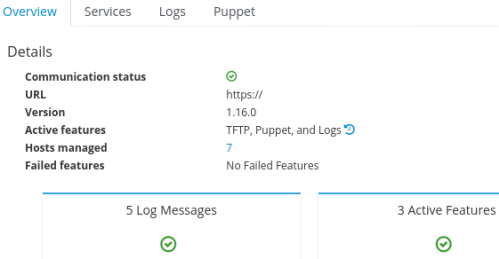
Check if the proxy is available in the foreman web UI under “Infrastructure -> Smart Proxies” and click on the new foremandmz.example.com. If all went well the proxy should have a green checkmark on “communication status” and shows the features and log messages.
First steps on problems:
- check the firewall for configuration and dropped packages in the log
- check the installer errorlog on the smartproxy for errormessages
- check the possibility to resolve the names of both hosts