Raspberry pi + Network UPS tools + mqtt
Every server should have a UPS to protect the system from power outage or over voltage situations and enable controlled shutdown. So do my systems as well. I have one Eaton 5P1500R and two Eaton 5P850R 1U Rack UPS systems running. I do like to monitor them and send out some notifications if any state changes on any UPS. Luckily the UPS provide an USB port to connect to and get the status from it. There is an option for a LAN card but this is more expensive. Such a price might be ok for an company but not really needed for my homelab.
The final solution involves more than just NUT and mosquitto. This part shows how to set up Network Ups Tools on a raspberry pi to monitor a ups and send a notification to a MQTT broker. In part two I show you the second part of my setup and how I use mqtt, node-red and a telegram bot to keep me up to date.
Using a Raspberry PI as NUT server
I do not cover the basic setup of the raspbian OS here. The image of the debian based raspbian distribution is located at raspberrypi.org . I recommend using the “Raspbian Buster Lite” or if you like to have a GUI the “Raspbian Buster with desktop” versions. In fact you do not need any GUI to make this work.
sudo apt-get install nut
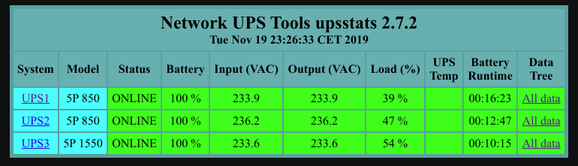
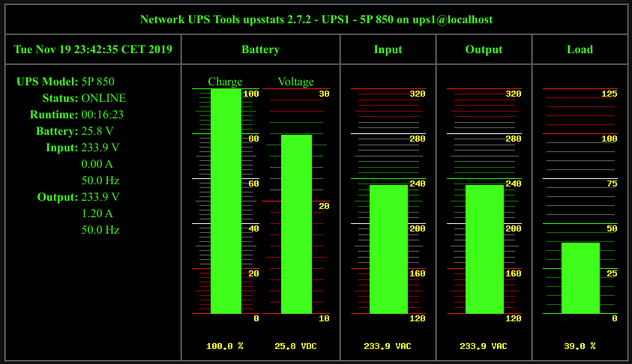
This should install the meta package which contains at least nut-client and nut-server. If you like to have a cgi-script to access all the UPS details, you also should make sure that nut-cgi and apache2 is installed as well. The nut-cgi gives you a nice overview like the one below.
Configure UPS utils
Below you find the configuration files for NUT I use for my setup. The passwords are not the real ones ;-)
nut.conf
I use the nut installation on the raspberry pi as a network server version. Setting it up that way enables all my servers to get the state of the connected UPS for that particular server. To configure the instance as a server, just set the mode to netserver in /etc/nut/nut.conf.
MODE=netserver
ups.conf
Next you have to configure your attached UPS devices. This also ensures that they are not assigned to a different name depending on the usb enumeration. I use the serial to make sure UPS1 is always UPS1. I also set the option sdorder which ensures that the UPS where the Pi is attached to, gets turned off as the last UPS and all others are turned off before. The shutdown starts with 0 and the last one here is 2.
[ups1]
        driver = usbhid-ups
        port = auto
        serial = G115F?????
        desc = "Eaton 5P 850VA UPS1"
        sdorder = 2

[ups2]
        driver = usbhid-ups
        port = auto
        serial = G115F?????
        desc = "Eaton 5P 850VA UPS2"
        sdorder = 0

[ups3]
        driver = usbhid-ups
        port = auto
        serial = G117F?????
        desc = "Eaton 5P 1500VA UPS3"
        sdorder = 1
upsd.conf and upsd.users
These files are documented well and it should not be difficult to adjust these for your needs. The upsd.conf does set the port and listing address including certificates and the upsd.users defines the users and their access rights. Adjust it to your personal needs.
upsmon.conf
In this configuration file I configure which UPS devices the monitoring daemon should check. As I like to get a notification for all changes on all my UPS boxes, I just enter them all. The line with the parameter NOTIFYCMD is the real interesting one. The script you configure there is the one that gets executed when a notification should be sent. But setting this alone will not be sufficient. To make upsmon call your script, you need to change the NOTIFYFLAG values and add a +EXEC to the end of the line. Also make sure that these lines are no longer comments but real assignments.
MONITOR ups1@localhost 1 upsmon yourpasswd master
MONITOR ups2@localhost 1 upsmon yourpasswd master
MONITOR ups3@localhost 1 upsmon yourpasswd master

NOTIFYCMD /etc/nut/mqttnotify/nutnotify.sh

NOTIFYFLAG ONLINE       SYSLOG+WALL+EXEC
NOTIFYFLAG ONBATT       SYSLOG+WALL+EXEC
NOTIFYFLAG LOWBATT      SYSLOG+WALL+EXEC
NOTIFYFLAG FSD  SYSLOG+WALL+EXEC
NOTIFYFLAG COMMOK       SYSLOG+WALL+EXEC
NOTIFYFLAG COMMBAD      SYSLOG+WALL+EXEC
NOTIFYFLAG SHUTDOWN     SYSLOG+WALL+EXEC
NOTIFYFLAG REPLBATT     SYSLOG+WALL+EXEC
NOTIFYFLAG NOCOMM       SYSLOG+WALL+EXEC
NOTIFYFLAG NOPARENT     SYSLOG+WALL+EXEC
nutnotify.sh and mosquitto_pub
Finally you need the script to publish a message to your mqtt broker. Before running the script the package mosquitto-clients needs to be installed. Just run sudo apt-get install mosquitto-clients to do this.
After successfully installing the needed clients, you can edit the script using sudo nano /etc/nut/mqttnotify/nutnotify.sh and use the following example as starting point.
#!/bin/bash
mosquitto_pub -h mqtt.example.com -t "/power/$UPSNAME/notify/$NOTIFYTYPE" -m "$1" -u mqttuser -P mqttpasswd --tls-version tlsv1.1 --cafile /etc/nut/mqttnotify/haefelfinger-ca.crt
As you see, there is a ssl certificate authority file defined. This is because I use a TLS connection to my broker. To make the client trust the host certificate, you may install your own ca certificate or pass it as file here.
NUT defines two environment variables you can use in your script. $UPSNAME contains the name of the UPS that triggers the notification. $NOTIFYTYPE contains the type name of the notification like ONBATT when the plug gets pulled. In $1 you find the message generated by upsmon. These messages can be customized in upsmon.conf as well. So the mqtt topic is based on the UPS name and the notification and the message content is the message generated by upsmon. This offers quite some flexibility on the consumer side.
In this example I also use a username and password to connect to the mosquitto server. Make sure that you restrict the rights on the script as well. To do this use the following commands.
sudo chown root.nut /etc/nut/mqttnotify/nutnotify.sh
sudo chmod 750 /etc/nut/mqttnotify/nutnotify.sh
This way only root and the nut group users ar able to read or execute this file.
You can test your script by running it using the following example as root or nut user.
UPSNAME=UPS1 NOTIFYTYPE=ONLINE /etc/nut/mqttnotify/nutnotify.sh "Testmessage"
This should publish a message with the content Testmessage using the topic /power/UPS1/notify/ONLINE on your mqtt broker.
Summary
At this point you have a NUT installation monitoring your ups devices and sending out some mqtt messages if any of the states change. You may continue on your own way from here on or wait for my second article where I show how to use node-red to get these notifications and pass them over to my telegram bot .